
Biomedical and Electrical Engineer with interests in information theory, evolution, genetics, abstract mathematics, microbiology, big history, IndieWeb, mnemonics, and the entertainment industry including: finance, distribution, representation

boffosocko.com

chrisaldrich

chrisaldrich

+13107510548

chris@boffosocko.com

stream.boffosocko.com

www.boffosockobooks.com

chrisaldrich

mastodon.social/@chrisaldrich

micro.blog/chrisaldrich


Adding a photo to a Known "Post"

1 min read

Known has several post types, each of which is good for particular content types. Sadly, one can't add photos to statuses or replies, though one could accomplish much the same thing with a photo post type.

In a "Post" type, one may need to switch from the plain text editor to the rich text editor to be able to insert a photo by clicking on the photo icon in the toolbar which only appears on the rich text editor. A modal window will then open up that will allow you to upload a photo and add metadata about it prior to inserting it into your post.

Tip: selecting the image in the post and re-clicking on the photo icon will allow you to edit the image source, description, and dimensions. 


An Annotated Domain of One’s Own

2 min read

Jeremy, Congratulations on having your own domain! I was poking around Hypothes.is today and was excited to see that you'd moved over from Genius.

I'm impressed that you specifically mention the IndieWebCamp philosophy, which I've also been using for the past couple of years myself.  If you need some help in IndieWeb-ifying your WordPress install, I'd be happy to help, though it's now much, much easier to do than it was even a year ago. Shortly, I'm hoping to finish up a post about the IndieWeb and academia/educational related sites, which might also be helpful, though I'm not sure when that's actually going to be finished.

I'd love nothing more than to have Hypothesis be able to have webmention support so that when people annotate my own pages or reference them across the web, the system would automatically send me a notification of that fact. Are there any coders at Hypothes.is who are also part of the IndieWeb movement who might consider doing this? Is there a way to help suggest this into Hypothes.is's roadmap?

Finally, as a side-note, to help beautify your web presence a bit, you might notice that your photo doesn't show up in the author position in your 2016 theme on single posts.  To fix this, you can (create and) use your WordPress.com username/password to create an account on their sister site Gravatar.com. Uploading your preferred photo on Gravatar and linking it to an email will help to automatically populate your photo in both your site and other wordpress sites across the web. To make it work on your site, just go to your user profile in your wordpress install and use the same email address in your user profile as your gravatar account and the system will port your picture across automatically. If necessary, you can use multiple photos and multiple linked email addresses in your gravatar account to vary your photos.

Congratulations again!


Updating @WithKnown Past 0.7.7 and Keeping Social Media Integration

3 min read

Last night I upgraded my WithKnown installation from 0.7.5 to 0.7.7.1 and was shocked to see all of the social media integration of my instance had completely disappeared!  

Suddenly POSSE wasn't POSS-I-ble!

Starting with 0.7.7, Known had taken out the old social media plugins and replaced them with Convoy. While I'm sure Convoy is awesome and makes social media integration for POSSE dead simple, something in my gut told me that it just wasn't for me.  I also didn't want to throw away the hour or so I spent configuring all of the plugins in the first place only to end up paying $50 a year for the same thing I'd already had. Those who haven't dealt with it already, will probably find Convoy a great value, though it'd probably be better billed as a one-time fee rather than a recurring one.

I'll admit that I panicked for a while and contemplated restoring the original 0.7.5 server code from back-up.

Fortunately a cooler head prevailed and some research and internet searching began.  I didn't find much immediately - the drawback of living so close to the bleeding edge of technology when still learning how all of it works.

I tried to see if I could uninstall the Convoy plugin by going into the site configurations and changing the plugin to disable it. Sadly, of the dozen or so plugins, Convoy is the only one that didn't ship with an "enable"/"disable" button. I'm sure they'll fix this shortly, but for those who want to do it manually, simply add the following line of code to your config.ini file:

     antiplugins[] = 'Convoy'
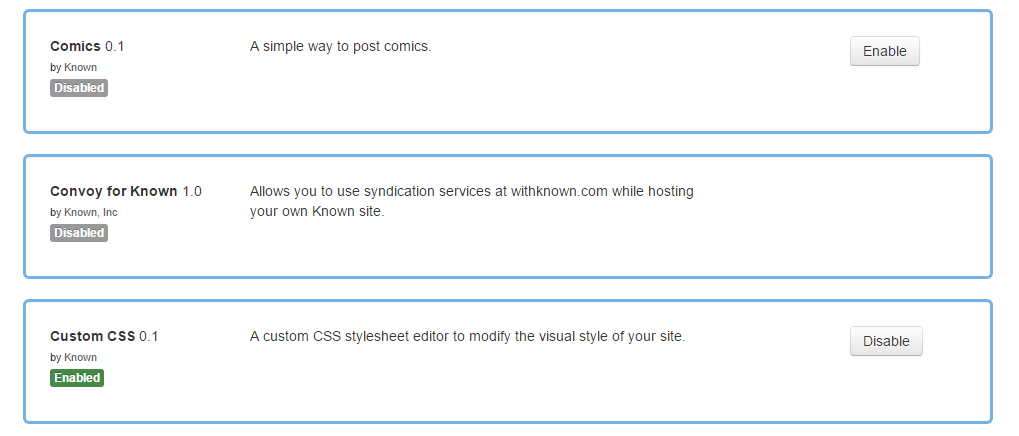
Screen capture of Plugins Settings Page

Eventually, I spent some time digging into the code and comparing/contrasting all the files.  Noticing that 0.7.6 had six or so additional folders for each of the social media plugins hiding within the IdnoPlugins folder (Facebook, Twitter, Flickr, SoundCloud, etc.), I simply dragged and dropped all of those over into 0.7.7.1 and voila! We're back up and running.

As a fine point, one should notice that both the FourSquare and Twitter plugins have been updated since 0.7.6, so they should be copied and dragged over from the main GitHub repository.  Following a similar procedure will also need to be watched/followed for future updates on occasion as well.

For future UX, I'm hoping that Known will at least as a minimum install and make Convoy available directly, but that disabling it will make the other original plugins viewable and configurable for the more technically minded, particularly as POSSE is one of the cornerstones of the IndieWeb movement.

As a quick recap for those doing general Known upgrades, try the following:

  1. Back up your database and your code, just in case;
  2. Download the new repository (either GitHub or on WithKnown);
  3. Delete the "dummy" Uploads folder from the new install and keep your original on the server which has all of your photos, etc.;
  4. Keep your config.ini; 
  5. Keep your .htaccess (unless it needs a serious change; the htaccess.dist replacement file can be easily copied over, but will need to have its name changed from the version with the .dist extension);
  6. Keep the social media plugin folders in IdnoPlugins that you intend to continue using; or upload newer versions which are availble from https://github.com/idno ​;
  7. Upload all the new files to the server directory.

Those with an adventurous spirit may also find some of the other available plugins fun to play around with too.


A Comment on the Academica Wordpress Theme

2 min read

In reply to: https://wordpress.org/support/topic/surprised-by-all-the-bad-reviews

I agree wholeheartedly with Adam, though I don't think I'd really seen any small issues except perhaps for an odd CSS issue in formatting an h2 tag somewhere. (Note: This comment applies to v1.2.3 of Academica as on 4/2/15, the theme publisher made a DRASTIC change to the theme, so take caution in upgrading!!)

I have created a child-theme with one or two small customizations (slightly larger headings in side widgets and some color/text size changes), but otherwise have v1.2.3 working as perfectly as it was intended to. This includes the slideshow functionality on the homepage. See BoffoSocko as an example.

For those, perhaps including Adam, wanting to get the slider to work properly:

  • Go to your WP Dashboard hover on the menu tab "appearance" and click on "customize"
  • On the "Featured Content" tab, enter a tag you want to use to feature content on the homepage of your site. (In my case, I chose "featured" and also clicked "Hide tag from displaying in post meta and tag clouds".)
  • Go to one or more posts (I think it works on up to 10 featurable posts) and tag them with the word you just used in the featured content setting (in my case "featured"
  • Next be sure to actually set a "Featured photo" for the post--930x300 pixels is the optimal photo size if I recall.
  • Now when you visit your home page, the slider should work properly and include arrows to scroll through them (these aren't as obvious on featured photos with white backgrounds).
  • Note that on individual pages, you'll still have static header image(s) which are also customizable in the "customize" section of the WP dashboard, which was mentioned in step 1.

I hope this helps.


Upgrading @WithKnown on One's Own Server

3 min read

It's only been a short time since I installed my own copy of WithKnown (GitHub) and there have been a few small upgrades since that time, but I was overdue for upgrading. I'd also seen one or two errors when posting, and figured that the small bugs I was seeing would have been worked out.

When I went to upgrade earlier in the week, I figured I'd wing it since at the time there weren't any instructions for upgrading in the documentation (or at least that I'd noticed at the time.)  Somehow I got sidetracked and finally just came back to it today.  Following the general procedure for upgrading projects like Drupal and WordPress, I trundled along and found generally reasonable results until I realized that URLs weren't mapping quite properly, photos were missing, and something was a bit "off". (I had tried reinstalling my original config.ini file along with the Uploads file, but that didn't seem to work somehow.)

I went back to check the documentation, and lo-and-behold, in the intervening week,  there are now some scant upgrade instructions available which follow below: 

Upgrading Known is designed to be very simple.

  • Take a backup of your Known directory and database.
  • Overwrite your Known files except your upload directory.
  • Access your Known site homepage.

I was reticent upon visiting my homepage as I received a splash screen exactly like the original set up, and was very worried that I might manage to blow out some of the primary data and crash the whole thing. (I did remember to do a back up before starting, but who wants to deal with that if they don't have to.)

I decided to plunge ahead and proceeded like I was setting things up for the first time. I was directed to a page to enter in the database name, login, password, etc., which creates a config.ini file in the root, and was then redirected to my site, with all the links and data perfectly intact and functioning properly. 

For those who haven't done it themselves, and have the same reticence I did, I'd recommend adding a few additional steps to the process:

4. Click on the set up button

5. Enter in your database name, user name, host name and password

6. Update the path for the "Uploads" folder. (It may automatically default to the proper path name, but double check it.)

7. Hit enter and you'll be taken to your site.

Depending on what one is using for the update, I might also recommend blowing out (deleting) the original Known files in your root directory in step 2, and installing the new ones rather than simple overwriting so one isn't left with out of date files.